Wednesday, 21 December 2011

Best Ever Butter Cookie

I’ve been making these butter cookies every Christmas for over 10 years.  They are the best – simple, buttery, and very addictive.  My friends are huge fans – some would say these are their favorite out of all the cookies I make.  The secret ingredient is the vanilla syrup – instead of using vanilla extract, I use vanilla syrup that coffee shops use to flavor their coffee.  I used to decorate these cookies with icing, but now I prefer to sprinkle decorations before baking.

Butter Cookies
Ingredients
1 cup butter
1 ¼ cup sifted icing sugar
2 Tablespoon vanilla syrup
1 egg
2 ½ cups flour
½ teaspoon baking soda
½ teaspoon salt

Directions
1.       Cream butter and sugar until fluffy.
2.       Beat in vanilla syrup and eggs.
3.       Whisk flour, baking soda, and salt in a bowl.  Gradually add into butter mixture.
4.       Wrap dough in plastic wrap and chill in the refrigerator for 3 hours or overnight. You can also freeze the dough for up to 6 months.
5.       To bake, preheat oven to 350 degrees F.
6.       Roll out dough to ¼ inch thickness or less, and cut shapes with cookie cutters.
7.       Place on an ungreased cookie sheet and add decorations (if desired).
8.       Bake for 4-6 minutes, or until the edges are slightly golden.
9.       If decorating with royal icing, ice after the cookies have cooled completely. 

Before baking.
I made sent some of these cookies to my friend in Toronto.  Here’s how I packaged them.
All ready for more newspaper to cushion the cookies.


Verdict: Delicious as always! Even better the next day as the flavours become more prominent.


Monday, 19 December 2011

Gingerbread House


I love the smell of gingerbread during the holiday season.  I make a gingerbread house every year just to fill the apartment with the smell.  I used to buy the pre-made houses, but started making them from scratch because I get to design my own house.  Here are a couple pictures of the one I did last year:


This year, I used the same recipe, but made a different house template.  I also used melted white chocolate melting wafers to pipe the designs instead of royal icing (mostly because I was lazy to make the icing, plus, there’s always a lot of leftover icing that I unhappily end up throwing out).

Check out the verdict at the end of the post!

Gingerbread with Fresh Ginger
Adapted from here.
 
Ingredients
1/2 cup butter, at room temperature
1/2 cup brown sugar
1/4 cup molasses
1 tablespoon cinnamon
1 ½ Tablespoon grated fresh ginger
1 1/2 teaspoons ground cloves
1 teaspoon baking soda
2 cups all-purpose flour
2 tablespoons water

House template
Measure and cut out house piece paper templates.  You can find one here. If you are going to include a surprise inside the house (e.g., a Christmas tree), be sure to cut our some windows so that you can see it.

Instructions
1.       In a large bowl, mix butter, sugar, molasses, ginger, cloves, and baking soda until well combined. 
2.       Mix in flour and water.
3.       Wrap dough in plastic wrap and chill in the refrigerator for 1 hour.  You can freeze for up to 6 months.
4.       To bake, preheat oven to 350 degrees F.
5.       Roll out dough in pieces big enough for each template piece. Transfer rolled out dough to baking sheet, place template on top, and trace around with a butter knife.  Remove the excess.
6.       Bake for 6 minutes (longer if dough is thicker), and leave on baking sheet for a few minutes before transferring to cooling rack.


Assembly
1.       Since I used melted chocolate, I decorated the house pieces before assembly.  Use either melted white chocolate or royal icing to pipe designs.
2.       To make the glue that will hold the pieces together, cook 1/3 cup sugar in a saucepan on low heat until golden.  Use a spoon to spread the sugar “glue” on the edges of the house and press together.  Work quickly as the “glue” hardens almost immediately spreading onto the gingerbread.  Be very careful not to touch the cooked sugar –it will burn you!
3.       After the walls are secured to the base, glue the Christmas tree inside.

The sugar glue is ready when this colour.


The back.

The surprise inside!

Verdict: The smell of gingerbread fills the apartment for weeks! I made gingerbread cookies with the left over dough, which were very tasty!  I’ve never made gingerbread with dried ginger, but these cookies made with fresh ginger are flavourful!  As for the white chocolate, I think I’ll go back to royal icing next year, as the melted chocolate was a tad too liquid to do intricate piping work.


Tuesday, 13 December 2011

2 Types of Rice Crispy Squares


When my colleague told me that her mom made rice crispy squares with Mars chocolate bars, I had to make them!  She melted the Mars bars before adding the cereal, but I decided to cut them into chunks and disperse them throughout the squares.  I have also wanted to try making browned butter rice crispy squares, so I thought I would make these too, and bring them for my colleagues at work.

Check out the verdict at the end of the post!


Browned Butter Rice Crispy Squares
Adapted from here. http://ricekrispies.ca/cgi-bin/rk_ca_2007/recipe.pl?id=14

Ingredients
¼ cup butter
5 cups mini marshmallows
1 ½  teaspoons vanilla syrup
6 cups puffed rice cereal
*For a chewier square, double the butter if browning

Directions
1.       In a large pot, melt and brown butter (i.e., cook until it browns and smells like toffee) over medium-low heat.
2.       Stir in marshmallows until melted.
3.       Stir in vanilla.
4.       Take off the heat and add puffed rice cereal. Stir until well coated.
5.       Press into a pan, and cool before cutting.


Mars Bar Rice Crispy Squares
Recipe is the same as above plus 4 Mars bars, cut into chunks.
Stir in the chopped Mars bars after adding the puffed rice cereal.

Chopped Mars Bars


Verdict: Both these squares were very tasty! My colleagues seemed very pleased!  I liked the way you get a chunk of the chocolate bar with some bites of the square.

I would recommend doubling the butter if you are going to brown it as a lot of it evaporates during the process.  This will make a chewier square.


Monday, 5 December 2011

Chestnut Banana Bread


What to do with super ripe bananas? Banana bread of course! As per usual, I wanted to kick it up a notch, so I added 2 things: browned butter and chestnuts.  Since this was going to be for me, I used whole grain flour and no sugar, but I’m sure they’ll be just as tasty with regular flour and sugar.  Another thought: all butter should be browned butter! Making the browned butter was incredible - it made my mouth water and kitchen smell like toffee happiness!

Check out the verdict at the end of the post!

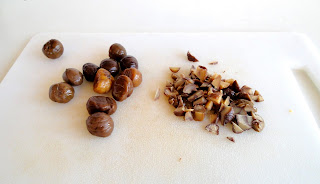
Left: chestnuts in shell; Right: shelled chestnuts

Browned butter after cooling.

Chestnut Browned Butter Banana Bread
Ingredients
¼ cup butter
4 ripe bananas
1 egg
1 ½ cups flour (I used ½ cup each of whole wheat, spelt, and cake flour)
¼ teaspoon salt
1 teaspoon baking soda
½ cup chopped chestnuts (I used shelled chestnuts, but you can roast and peel your own!)

Directions
1.       Make browned butter by heating up butter in a small saucepan over low heat.  Swirl pan frequently as it bubbles gently.  The butter is finished when it darkens in colour and smells like toffee.  Place in a bowl and cool.
2.       Preheat oven to 325 degrees.  Line loaf pan with parchment paper or grease and flour.
3.       In a small bowl, mix flour, salt and baking soda.  Set aside.
4.       In a large bowl, mash bananas.  Add egg and butter. Mix.
5.       Add the chopped chestnuts and mix.
6.       Add the flour mixture and mix until just combined.
7.       Pour into pan and bake for 65 minutes, or until toothpick comes out clean.
8.       Cool on rack before slicing.
* If you prefer a sweeter banana bread, add ½ cup of sugar at step 4.

Left: Chestnuts before chopping

Before baking.

After baking.


Verdict: This recipe created a moist bread that was flavourful and not too sweet.  The chestnuts gave it a soft chewy texture that I loved.  These are a great snack!


Saturday, 26 November 2011

Apple Cranberry Tarte Tatin


I was in the mood to make a simple snack or dessert that I could make with the ingredients in my fridge.  I remembered watching a cooking show in which they made an apple tarte tatin, and thinking that it was so easy and required very few ingredients.  On the show, they made a pie crust, but since I had puff pastry, I figured that would work just as well (and keep me from having to make a crust!).  I also thought it would be nice to add cranberries.

Check out the verdict at the end of the post!

Apple Cranberry Tarte Tatin
Inspired from here

Ingredients
3 firm apples (I used Galas)
Juice of ½ a lemon
¼ cup butter
¼ cup sucanat sugar (or brown sugar)
2 Tablespoon real maple syrup
1/3 cup cranberries
Puff pastry

Directions
1.       Peel and core apples. Cut into 4.
2.       Place in a bowl and mix with lemon juice.  Set aside.
3.       In a cast iron pan, melt butter on medium heat.
4.       Add sugar and maple syrup, and cook until bubbly (around 1 minute).
5.       Add apples and cook for 15 minutes on medium.  Let the syrup bubble and reduce - it should be much thicker after 15 minutes.
6.       Sprinkle cranberries over the apples.
7.       Preheat oven to 400 degrees.
8.       Roll out puff pastry so that it’s big enough of over the cast iron pan.
9.       Place puff pastry on over the apples, tucking in the edges. Pierce air vents into pastry with a knife.
10.     Bake for 20 minutes.
11.     Cool until still a little bit warm.  Place plate on pan and invert.  If apples stick to the pan, pick them off and place on the pastry.


Apples in lemon juice.

Melting butter.

Butter, sucanat, and maple syrup, ready for apples.

Apples cooking in syrup.

Apples ready for pastry.

Puff pastry rolled out.

Adding air vents.

After baking.


Verdict: This tart was SO delicious.  The apples melt in your mouth and the cranberries give a nice tartness.  I will definitely make again.  It was such a simple dish with high visual and taste impact!


Sunday, 13 November 2011

Apple Raspberry Bran Muffins


I wanted to make a snack that I can bring to work.  I get hungry around 3pm – that time between lunch and dinner.  I like muffins but the ones at the stores have a ton of sugar and are huge!  Time to make my own.

Check out the verdict at the end of the post!
Apple Raspberry Bran Muffins
Makes 7 small muffins.

Ingredients
Dry:
½ cup whole wheat flour
¼ cup bran
½ teaspoon baking soda
½ teaspoon baking powder
½ teaspoon cinnamon
¼ teaspoon nutmeg

Wet:
1 egg
¼ cup oil
1/3 cup yogurt
¼ cup sucanat sugar (or brown sugar)
¼ cup apple juice

½ cup (total) of raspberries and cubed apples 

Directions
1.       Preheat oven to 350 degrees. Line cupcake pan with 7 cupcake liners
2.       In a small bowl, whisk all dry ingredients. Set aside.
3.       In a larger bowl, beat all wet ingredients.
4.       Add dry ingredients to wet, and mix with a spatula until just combined.
5.       Fold in apples and raspberries.
6.       Spoon batter into liners, just over ¾ full.
7.       Bake for 13 minutes, or until toothpick comes out dry.

Before baking

After baking


Verdict: These muffins turned out super moist and perfectly sweet.  The raspberries gave them a really nice kick of flavor.  These will make a great afternoon snack at work!


Tuesday, 8 November 2011

Twilight Cake


My friend asked me to make a birthday cake for her boss – a die-hard Twilight fan.  She said that her boss likes a light cake with fruit.  She also handed me a chess set and Twilight stickers.  If you’re a Twilight fan, you’ll know that the cover of the Breaking Dawn book has a chess set.


For this Twilight cake, I thought an angel food cake with raspberries would be fitting.  And I managed to work in the chess set and stickers, too.

Check out the verdict at the end of the post!

Raspberry Swirl Angel Food Cake
Adapted from here.

Ingredients
1 ¼ cups sifted cake flour
1 ½ cup sugar
Pinch of salt
½ cup raspberries
1 ¾ cups egg whites
1 teaspoon cream of tartar
1 ½ teaspoon vanilla extract

Directions
1.       Preheat oven to 350 degrees. Put rack in lower third.  Lay parchment paper on the bottom of the cake pan.
2.       In a small bowl, sift flour, ½ cup sugar and salt together 2 times.  Set aside.
3.       Mash raspberries with a fork and press through a sieve to get rid of the seeds.  You should end up with ¼ cup of mashed raspberries.
4.       In a large clean metal bowl, beat egg whites until foamy.
5.       Beat in cream of tartar and vanilla until near stiff peaks.
6.       Beat in remaining 1 cup of sugar, 2 tablespoons at a time until stiff peaks.
7.       Sift flour over egg whites and fold in with a spatula.
8.       Transfer 1/3 of batter to the pan and spread evenly. Dollop raspberries onto batter.
9.       Repeat step 8.  Top with the last 1/3 batter.
10.   Run a knife through the batter.
11.   Bake for 22 minutes or until toothpick comes out clean.
12.   Cool in the pan for 1 hour before unmolding.
13.   Slice cake into 2 layers.

Egg white mixture before adding flour.

Dollops of raspberry (Step 8)

Before baking

After baking

Raspberry Filling
Ingredients
Raspberry jam
Small pack of raspberry gelatin
1 cup of raspberries (I used thawed frozen ones)

Directions
1.       Microwave jam to liquefy.
2.       Add raspberry gelatin. Taste as you go to get the flavor that suits you.
3.       Mix in the raspberries.
4.       Let it set in the refrigerator.  If there’s a lot of excess liquid, strain the mixture.

Buttercream Frosting
Beat 1.5 cups of softened butter, 6 cups of icing sugar, 1.5 teaspoons of vanilla extract, and 3 teaspoons of milk until fluffy.

Assembly
1.       Lay bottom cake layer on the plate.  Spread a thin layer of buttercream frosting and outline a “dam”.
2.       Spread the raspberry mix on top (within the dam).
3.       Place second cake layer on top.
4.       Frost entire cake and decorate – I put a chess board on top, and a ribbon with Twilight stickers around the sides of the cake.


Step 2

Covered with buttercream

Chess board with straw glued to the bottom as an anchor


Verdict:   According to my friend, the cake was a hit!  When they cut the cake, the raspberry filling squirted out and looked like blood, which added to the effect of Twilight!  My friend served it with “blood” punch!