Pages

Sunday, 28 August 2011

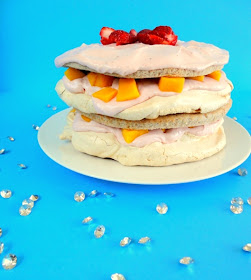
Strawberry Mango Meringue Layer Cake


We threw a Harajuku themed bridal shower for our friend Joanne a couple weeks ago.  She knew that there was going to be a party, but we surprised her with the theme.  If you don’t know what harajuku style is, check this out.  There were about 25-30 people there, all of whom dressed up!  She loved it. 

I made a cake for her, which wasn’t necessarily Harajuku styled, but still pretty cool.  Multiple layers of strawberry chiffon, meringue, strawberry cream cheese frosting, and mangos!  Sounds good to me!

Check out the verdict at the end of the post!

Strawberry Chiffon Cake Layers
Adapted from here.

Ingredients
1 cups + 2 Tablespoons sifted cake flour
¾ cup sugar, divided into ½ and ¼ cups
½ Tablespoon baking powder
1/8 teaspoon salt
1/3 cup pureed strawberries (about 4 strawberries)
3.5 Tablespoons vegetable oil
1 teaspoon vanilla extract
4 eggs separated into yolks and whites, room temperature

Directions
1.       Preheat oven to 325 F. Line the bottom of 3, 8-inch baking pans with parchment, but do not grease the sides.  (Alternatively, you can bake in a taller pan and slice the cake to make 3 layers, but be sure to adjust the baking time.)
2.       In a medium metal bowl, beat egg whites to soft peaks.  Gradually add ¼ cup of sugar and beat until stiff peaks.  Set aside.
3.       In a large bowl whisk flour, ½ cup sugar, baking powder and salt until combined.
4.       In another bowl, whisk strawberry puree, oil, vanilla, and egg yolks until mixed thoroughly.
5.       Pour strawberry mixture into flour mixture and beat just until combined.
6.       Mix ¼ of the egg whites into the batter. Fold in the rest of the egg whites in 2 additions.
7.       Pour evenly into baking pans and bake for 25 minutes.
8.       Cool and wire rack.  Run a knife around the edges and turn out.

Before baking.

After baking.

Meringue Layers
Adapted from here and here.
Makes 2 meringue layers.

Ingredients
4 egg whites
1/4 teaspoon cream of tartar
¼  teaspoon salt
1 teaspoon vanilla extract
1 cup sugar

Directions
1.       Preheat oven to 250 F. Trace 2 circles (of the cake pan from above recipe – I used 8 inch pans) onto parchment paper.  Place circle side down onto baking sheet.
2.       In a large metal bowl, beat egg whites, cream of tartar, and salt to soft peaks.
3.       Add vanilla and beat.
4.       Gradually add sugar and beat until stiff.
5.       Spread meringue into the circles on the baking sheet.
6.       Bake for 2.5 hours or until they are thoroughly dry. Leave in oven with heat turned off for another hour.
7.       Store in a cool dry place.


Before baking.

After baking.

Strawberry Cream Cheese Filling
Adapted from here.
Makes 2.5 cups

Ingredients
2 packages of cream cheese (16 ounces), room temperature
¼ cup + 1 Tablespoon butter, room temperature
1.5 cups icing sugar
1 teaspoons vanilla extract
3/4 cup strawberries

Directions
1.       In a large bowl, mix cream cheese, butter, and sugar until creamy.
2.       Mix in vanilla.
3.       Pure strawberries in a blender or food processor.  Mix into cream cheese mixture.
4.       Add more sugar if it is too runny.  Store in refrigerator until ready to use.

Frosting.

Cake Assembly
1.       Cut mangoes to ½ inch chunks to make 2 cups.
2.       Divide filling into 3 equal parts.
3.       Place a small amount (1 tablespoon) of filling on plate.  Place first cake layer on top.
4.       Place meringue layer on top.
5.       Spread filling on top of meringue.
6.       Sprinkle mangoes.
7.       Repeat: cake-> meringue-> filling-> mangoes
8.       The final layer is a cake layer.  Spread the last of the filling on top and decorate to your liking.

Layer 1: Chiffon cake

Layer 2: Thin layer of frosting

Layer 3: Meringue

Layer 4: Frosting

Layer 5: Manogos

Layer 6: Chiffon...and repeat


Verdict:  This cake was absolutely delicious! The crispy meringue layer gave a fantastic texture to this cake! The strawberry cream cheese frosting was super flavourful!  Everyone devoured it! One of things I loved about this cake was that although each part of this cake took time to make, assembly was a snap!  Will definitely make again.


Sunday, 21 August 2011

Monkey cake - chocolate, banana, and peanut butter


My best friend (the one who is getting married)’s nephew was turning 1 year old.  In fact, her bridal shower was combined with his birthday party!  She had asked me to make a chocolate peanut butter cake decorated as a monkey for him.  Well, if I was going to make a monkey cake, it needed bananas!  Ergo, the chocolate banana cake with peanut butter frosting!  I made a very small cake as I also made her a shower cake (posting next week) and she had requested another cake from a bakery.   Lots of cakes for a big party!

Check out the verdict at the end of the post.  Unfortunately, I couldn’t taste the monkey cake as I am allergic to peanuts.  I suppose I could have made it with almond or cashew butter, but the birthday boy loves peanut butter!


Chocolate banana cake
Adapted from here.
Makes a 5 X 2 inch cake and 3 cupcakes

Ingredients
½ cup sugar
¾ cup + 2 Tablespoons flour
¼ cup + 2 Tablespoons unsweetened cocoa powder
¾ teaspoon baking powder
¾ teaspoon baking soda
¼ teaspoon salt
1 large egg
½ cup mashed bananas (about 1 banana)
½ cup warm water
¼ cup buttermilk
¼ cup canola oil
¾ teaspoon vanilla extract

Directions
1.     Preheat oven to 350 F. Line baking pan with parchment and cupcake pan with liners.  I used a 5x2 inch cake pan, but if you want to make a larger cake, you’ll need to increase the recipe.
2.     In a large bowl, sift together sugar, flour, cocoa power, baking powder, baking soda, and salt.
3.     In a bowl, mix egg, mashed bananas, water, milk, oil, and vanilla extract. 
4.     Pour wet mixture into dry, and stir until combined.
5.     Pour into baking pans and bake:  28 minutes for cake, 13 minutes for cupcakes
6.     Cool on wire rack before frosting.

Before baking

Peanut butter frosting
Adapted from here.
Makes 2.5 cups

Ingredients
5 ounces cream cheese, room temperature
¼ cup butter, room temperature
2.5 cups icing sugar, sifted
1/3 cup smooth peanut butter

Directions
1.       Beat cream cheese and butter until fluffy.  I used a hand held mixer.
2.       Add icing sugar ½ cup at a time.  Beat until light and fluffy.
3.       Beat in peanut butter.

Monkey Cake Assembly
1. Cut cake and fill with frosting.
2. Trim cupcake to appropriate size and attached (without liners) to each side of the cake with frosting to make ears. 
3. Make a monkey face stencil and trace around it with a knife to score it.
4. Fill in the face and inner ears with frosting using a small spatula.
5. Color the rest of the frosting a darker brown colour with gel food colouring and cocoa.  Colour a small amount of the frosting black (for the eyes and mouth).
6. Using tip #233, pipe the rest of the monkey a darker brown.
7. Pipe the eyes and mouth with tip #3.
8. Keep in refrigerator until serving.

    Slicing the cake
    Peanut butter frosting filling
    Scoring the cake with a stencil and knife
     
    Face and ears filled in


Verdict:  I couldn’t try this cake because of my allergy to peanuts, but it was well received at the party!  I was able to try the cake (without frosting) and it had a subtle banana flavor – so if you like a stronger banana flavor, try putting sliced bananas in the middle layer.  This cake ended up looking a lot like the Subway monkey!

Cutting the cake at the party

Subway monkey

Sunday, 14 August 2011

Ultra Thin Chocolate Chip Cookies


I started a new job, and as nice treat, I thought I would bake my colleagues some cookies.  But what cookie should I bake?  You can’t go wrong with chocolate chip, but I wanted to go with something a bit different.  I came across this recipe for the Ultra Thin Chocolate Chip cookie which made a crisp cookie – quite the opposite of the chewy ones I usually make.  I decided to give it a try.

Check out the verdict at the end of the post!

Ultra Thin Chocolate Chip Cookies
Adapted from here.
Makes 21 cookies

Ingredients 
½ + 2 Tablespoon all-purpose flour
¼ teaspoon baking soda
¼ + 1 Tablespoon butter, melted and cooled
¼ cup quick rolled oats
¼ cup sugar
1/8 cup packed brown sugar
1 heaping Tablespoon light corn syrup
1 Tablespoon cream (or milk)
¼ teaspoon salt
½ teaspoon vanilla extract
½ cup dark chocolate chunks

Directions
1.       In a small bowl, whisk four and baking soda together.
2.       In a large bowl, whisk butter, oats, sugars, corn syrup, milk, salt, and vanilla.
3.       Mix in flour mixture.
4.       Stir in chocolate chunks.
5.       Rest dough at room temperature for a few hours (or overnight in the fridge).

To bake
6.      Preheat oven to 325 F.  Racks should be in the upper and lower thirds of the oven.
7.      Lay aluminum foil onto the cookie racks.
8.      Drop by (1/2 Tablepoon-ish) spoonfuls onto foil with plenty of space between cookies.  Flatten using parchment paper and the bottom of a cup until 2.5 inches in diameter.
9.     You can bake 2 cookie sheets at a time, one on the top and one on the bottom rack. Bake for 5 minutes, then switch racks for 4 minutes or until cookies are thin and very brown. 
10.  Slide entire foil onto the racks to cool completely.

Before baking: Press down dough with parchment paper and a cup.

After baking.

Storage Tip: I keep them in an airtight container with a cupcake liner filled with baking soda to remove the moisture and keep the cookies crisp.


Verdict: These cookies were so different from the ones I normally make.  They reminded us of Skor bars as the sugar in the cookies caramelized and crisped up.  Needless to say, they were deliciously addictive.  My colleagues liked them too as they were eaten up well before the end of the day!  I think I may have even created a baking environment as someone brought in home made blueberry-chocolate chip scones the next day – which were amazing!  By far, the moistest scones I’ve ever eaten.


Sunday, 7 August 2011

Blueberry Cheesecake Ice Pop


After the strawberry banana ice pops turned out so good, I wanted to take it up a notch and see what else I could make.  I came across a book dedicated to the art of making ice pops, which expanded my view of what an ice pop can be.  There is a standard formula (a base and mix-ins) but with endless possible combinations and ingredients!  Not to mention, that anything can be turned into an ice pop mold (check out this site http://icypops.com/pop_play.html)!! I was intrigued by the blueberry cheesecake ice pop as I had never even considered such a flavor, and it seemed like a fantastic idea.

Check out the verdict at the end of the post!


Blueberry Cheesecake Ice Pop
Adapted from Pop!
Makes 4 ice pops.

Ingredients
¾ cup blueberries
2 teaspoons agave syrup (or sugar)
¾ cup cream cheese (I used smooth ricotta because it was in the fridge)
3 Tablespoons cream
3 Tablespoons graham cracker crumbs
1 Tablespoon butter, melted

Directions
1.      In a small saucepan, heat blueberries and 1 teaspoon of agave syrup on medium heat.  Mash blueberries with a fork and continue to heat until the skins have broken down and sauce is thick.  Take off heat and cool.
2.      Distribute blueberry sauce evenly into ice pop mold.  Freeze for 1 hour.
3.      In a bowl, stir cream cheese, cream, and 1 teaspoon of agave syrup until mixed and there are no lumps. Alternatively, you can use a food processor.
4.      Distribute evenly among the ice pop molds and freeze for 1 hour.
5.      In a small bowl, mix graham cracker crumbs and melted butter.  Press on to the tops of the ice pop molds. Freeze for 6 hours.
6.     Before serving, leave the pops out in room temperature for 5 minutes for easy release from molds.

Blueberry sauce ready to cool.

First layer, ready to freeze.

Second layer.

Third layer.


Verdict:  The blueberry flavor was intense – I loved it!  Great flavor combination!  Hmm, what other ice pop flavors should I try…..?